简述使用ansible快速部署keepalived高可用nginx反代服务器,负载均衡后端lamp环境
部署环境示意图如下: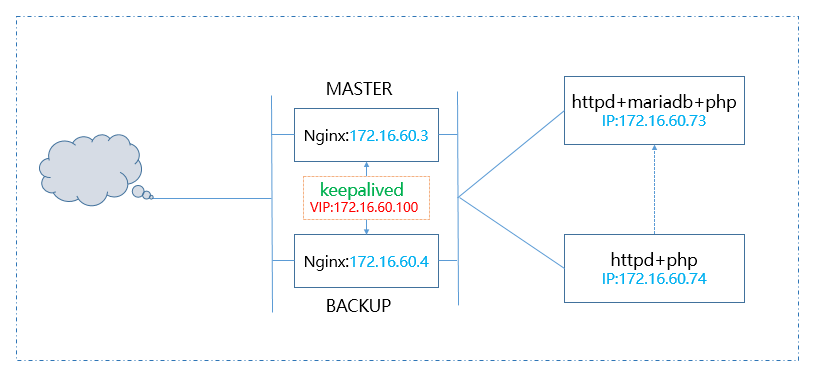
环境准备
- 系统:CentOS.x86_64.7.2
- 配置好IP并测试ansible主机与其它主机连接
- 配置好ansible主机基于ssh密钥连接,参考ssh命令
- 为实验方便进行,关闭各主机防火墙及SELinux
- 确保各主机上的yum源正常可用
ansible配置
ansible安装
1 | 先配置好epel源 |
主机清单设置
➤ vim /etc/ansible/hosts

[nginx_keepalived]
172.16.60.3 ip=172.16.60.3 role=MASTER host=node1 pri=100
172.16.60.4 ip=172.16.60.4 role=BACKUP host=node2 pri=98

[nginx_keepalived:vars]
vip=172.16.60.100
ifc=eno16777736
router_id=66
pass=fLsdk3Gk

[httpd_php]
172.16.60.73 website=web_1
172.16.60.74 website=web_2

[mariadb]
172.16.60.73
测试ansible主机连接

nginx角色配置

tasks文件
CentOS7官方yum源上的nginx版本为1.6.3,此处配置nginx官方提供的yum源
➤ vim /etc/ansible/roles/nginx/tasks/main.yml

    - name: prepare nginx repo
      copy: src=nginx.repo dest=/etc/yum.repos.d/
    - name: install nginx
      yum: name=nginx state=present
    - name: edit conf
      copy: src=default.conf dest=/etc/nginx/conf.d
    - name: start nginx
      service: name=nginx state=started
      notify: restart nginx
    - name: test page
      template: src=index.html.j2 dest=/usr/share/nginx/html/index.html
files文件
# nginx官方yum源,此版本为1.10.1
➤ vim /etc/ansible/roles/nginx/files/nginx.repo

    [nginx]
    name=nginx repo
    baseurl=http://nginx.org/packages/centos/7/$basearch/
    gpgcheck=0

# nginxs配置文件
➤ vim /etc/ansible/roles/nginx/files/default.conf

    upstream webs {
        server 172.16.60.73;
        server 172.16.60.74;
        server 127.0.0.1:8080 backup;
    }

    server {
        listen 80;
        location / {
            proxy_pass http://webs;
        }
    }

    server {
        listen 8080;
        server_name localhost;
        location / {
            root   /usr/share/nginx/html;
            index  index.html index.htm;
        }
    }
handler文件
# 修改配置文件时触发生重启操作,以下服务略
➤ vim /etc/ansible/roles/nginx/handlers/main.yml

    - name: restart nginx
      service: name=nginx state=restarted
templates文件
# 后端主机都故障时报错页面,显示ip为测试nginx高可用使用
➤ vim /etc/ansible/roles/nginx/templates/index.html.j2

    <h4>IP: {{ ip }}</h4>
    we will back soon...
keepalived角色配置
tasks文件
➤ vim /etc/ansible/roles/keepalived/tasks/main.yml

    - name: set hostname
      hostname: name={{ host }}
    - name: install keepalived
      yum: name=keepalived state=present
    - name: edit conf
      template: src=keepalived.conf.j2 dest=/etc/keepalived/keepalived.conf
      notify: restart keepalived
    - name: notify script
      copy: src=notify.sh dest=/etc/keepalived
    - name: start keepalived
      service: name=keepalived state=started
templates文件
# keepalived主配置文件模板
➤ vim /etc/ansible/roles/keepalived/templates/keepalived.conf.j2

    !Configuration File for keepalived
    global_defs {
        notification_email {
            root@localhost
        }
        notification_email_from keepalived@localhost
        smtp_server 127.0.0.1
        smtp_connect_timeout 30
        router_id {{ host }}
        vrrp_mcast_group4 224.0.100.18
    }

    vrrp_script chk_nginx {
        script "killall -0 nginx"
        interval 1
        weight -5
    }

    vrrp_instance VI_1 {
        state {{ role }}
        interface {{ ifc }}
        virtual_router_id {{ router_id }}
        priority {{ pri }}
        advert_int 1

        authentication {
            auth_type PASS
            auth_pass {{ pass }}
        }

        virtual_ipaddress {
            {{ vip }}/32 dev {{ ifc }}
        }
        track_script {
            chk_nginx
        }

        notify_master "/etc/keepalived/notify.sh master"
        notify_backup "/etc/keepalived/notify.sh backup"
        notify_fault "/etc/keepalived/notify.sh fault"
    }
files文件
# nginx主备切换通知脚本
➤ vim /etc/ansible/roles/keepalived/files/notify.sh

    #!/bin/bash
    contact='root@localhost'

    notify() {
        mailsubject="$(hostname) to be $1, vip floating."
        mailbody="$(date +'%F %T'): vrrp transition, $(hostname) changed to be $1"
        echo "$mailbody" | mail -s "$mailsubject" $contact
    }

    case $1 in
    master)
        notify master
        ;;
    backup)
        notify backup
        systemctl restart nginx
        ;;
    fault)
        notify fault
        systemctl restart nginx
        ;;
    *)
        echo "Usage: $(basename $0) {master|backup|fault}"
        exit 1
        ;;
    esac
httpd角色配置
➤ vim /etc/ansible/roles/httpd/tasks/main.yml

    - name: install httpd
      yum: name=httpd state=present
    - name: install php
      yum: name=php state=present
    - name: install php-mysql
      yum: name=php-mysql state=present
    - name: html page
      shell: echo {{ website }} > /var/www/html/index.html
    - name: php page
      shell: echo '<?php phpinfo();?>' > /var/www/html/index.php
    - name: restart httpd
      service: name=httpd state=restarted
mariadb角色配置
➤ vim /etc/ansible/roles/mariadb/tasks/main.yml

    - name: install mariadb
      yum: name=httpd state=present
    - name: start mariadb
      service: name=mariadb state=started

# php连接mysql测试页
➤ vim /etc/ansible/roles/mariadb/files/index.php

    <?php
        echo '<h2>dbserver</h2>'.'<br>';
        $conn = mysql_connect('127.0.0.1','root','');
        if($conn){
            echo 'connect mysql success!!!';
        }else{
            echo 'connect mysql fail!!!';
        }
以上就是所有角色的简要配置,可自行添加更多内容,如配置文件等
创建playbook调用
➤ vim /etc/ansible/lnamp.yml

    - hosts: nginx_keepalived
      remote_user: root
      roles:
      - nginx
      - keepalived
    - hosts: httpd_php
      remote_user: root
      roles:
      - httpd
    - hosts: mariadb
      remote_user: root
      roles:
      - mariadb
部署
1 | cd /etc/ansible/ |
以下是部分运行截图

测试
测试负载均衡
为了方便看出结果,在上述配置时有意将2台后端服务器首页设为不同,结果如下
测试lamp环境
测试php连接数据库,如下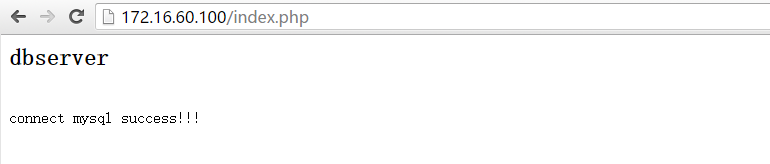
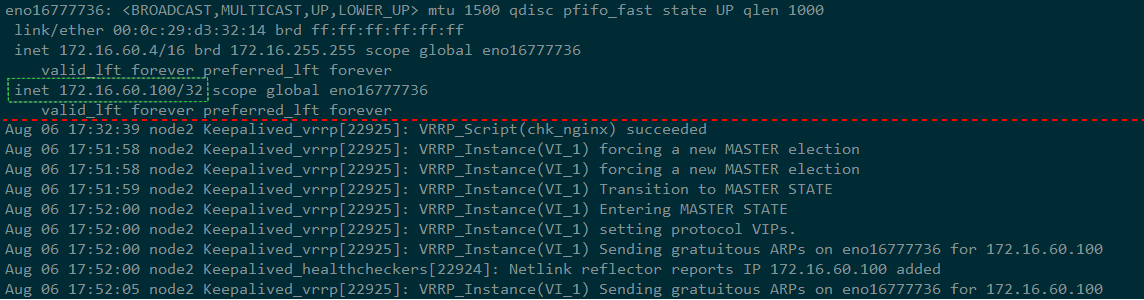
测试高可用
本实验中通过判断nginx的存活状态来实现主备切换,配合通知脚本,即当主nginx故障时,keepalived将状态切换为BACKUP,此时使用通知脚本重启nginx,如果重启成功则切换为MASTER,继续服务。
停止主nginx,查看备nginx上的keeplived状态
重新启动主nginx,备nginx上的keepalived状态

停止后端2台服务器,查看nginx提示页

以上就是本次实验的全部内容